
Leveraging the Joints command in Autodesk Inventor
By John Hackney, IMAGINiT Technologies
CAD/CAM/CAE AutoDesk Inventor Imaginit Technologies John HackneyBetween Two Faces: Joints surpass Constraints in assemblies if you know how to use them.
When Autodesk introduced Inventor assembly Joint command, it seemed to be an improvement over the basic assembly Constrain command. As I used the Joint command, I found that I could not select component origin or workplanes as connect selections. I have always used these two features for numerous assembly constraints especially when I want to center a component with another or to the base assembly.
A good example of this is shown below. The wedge component must fit on the midplane of the toolpost. If the component’s origin planes are modeled along the component centers, they can be used by the Constrain command to assemble the parts. This is not possible when using the Joint command.

The Inventor Joint command can still handle this particular situation if you are aware of a simple mouse right click option. Start the Joint command and choose Planar as the type of joint desired. The command will try and select the correct joint automatically but in a lot of cases it will get it wrong. In this case there is already a ball joint between the two spherical surfaces and the program would automatically select a rigid joint, which will conflict.
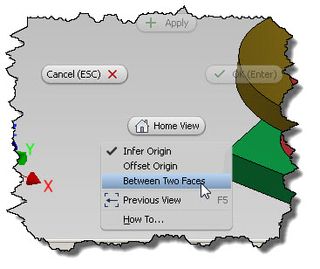
Before my first connect selection, I will use my mouse right button to display the context menu and select “Between Two Faces”.
Then I will select the two faces of the wedge component to define the center plane. To finish the first connect selection, I select a point on the center plane of the component. This will complete the first connect selection.

Before I begin selection for the second connect, I must remember to right mouse click and select the “Between Two Faces” option again. I then select the two inside faces for the slot in the toolpost and a point to describe the midpoint between them.

Finish the joint by selecting “OK” in the Joint Dialog box and the wedge will be centered correctly in my assembly.

It would be nice if the Joint command would allow for the selection of origin and workplanes because there are a number of occasions where two surfaces do not exist. The joint command has become my favorite assembly tool even if I have to drop back to the Constrain tool once in awhile.
For more Inventor tips and tricks, check out IMAGINiT Manufacturing Solutions Blog.
John Hackney is an IMAGINiT Technologies Mechanical Application Engineer with 25 years design exprienece in various manufacturing disciplines including converting and high speed pick and place machinery.