The thick and thin of rapid injection molding
By Gus Breiland, Customer Service Engineering Manager at Proto Labs
CAD/CAM/CAE plastic part design Proto LabsAvoid common resin cooling “gotchas” by following these wall thickness guidelines for plastic part design.
To understand the importance of uniform wall thickness in rapid injection molding, imagine that the fluid injected into a mold is water rather than plastic resin. In a properly vented mold, the water, following the path of least resistance, will quickly and uniformly fill every nook and cranny regardless of the shape and size of the mold’s features.
Resin, too, follows a path of least resistance through the mold, but in other respects resin is not at all like water. First, it is far more viscous than water and must be driven under pressure into the mold. Second, as it cools resin becomes viscous and eventually solidifies. And finally, after it solidifies — even after it feels cool to the touch — a molded plastic part can continue to shrink for hours. As a result, if a part is not properly designed, a mold may be difficult or impossible to fill uniformly with resin.
In general, two types of features can cause thickness-related fill problems. The first is an “island” of aluminum or core. This is a raised mold feature that forms a thin area in a plastic wall and through which the resin must flow. The second is an island of plastic, or cavity, a thick area of the wall that must be filled. Each represents a deviation from even wall thickness and presents its own challenges.
An example of an aluminum island is a decal recess in an otherwise uniform wall. If the recess reduces wall thickness significantly, resin will typically find a path of least resistance on either side of the recess. It will flow around the aluminum island and may fill the entire rest of the mold before backfilling the thin area. By then, the resin will have cooled, so the flow fronts that meet in that area may not fully meld, resulting in a cosmetically — possibly even functionally — compromised knit line.
Also, if the thin area is not vented, it can form a “gas trap,” in which air is compressed by the advancing resin. As a gas is compressed, it heats up in accordance with the ideal gas law (PV = nRT) and can “burn” the resin.
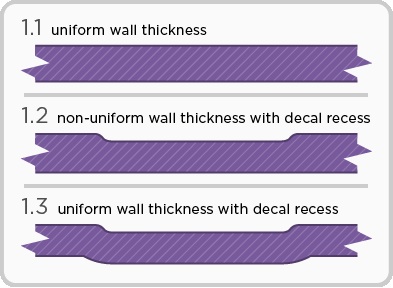
There is a simple way to create your decal recess without leaving a thin area in the wall; simply couple the recess on one side of the wall with a bulge on the other. In this way, the wall maintains its thickness and simply takes a slight detour. If the curve of the detour is smooth, the advancing resin will not slow, and the recess will fill right along with the surrounding wall area (see Figure 1).

Figure 1: Uniform wall thickness (1.1 and 1.3) allows the resin to flow freely when parts are being injection molded; whereas example 1.2 would cause a flow restriction of the material because of the thin area of the part.
An example of a plastic island would be a boss attached along its side to a wall. More resin at that location means more sink, typically on the opposite side of the supporting wall. The solution is to move the boss away from the wall, attaching it to the wall with a thin gusset (see Figure 2). To keep the gusset itself from acting as a thick area, it should be 50% +/- 10% of the thickness of the wall to which it connects. (The same applies to the walls of the boss in relation to the wall from which it rises.)

Figure 2: If a boss is located close to a vertical wall, it may be tempting to tie the boss to the wall by filling the space between the boss and the wall, resulting in a thick area. A better way to tie the boss to the wall is with one or more ribs.
In addition to sinking, thick areas can be difficult to fill in the first place. Resin passing through a thin area to reach the thick one can cool enough to “freeze” before the thick area can fill, creating a void. Gate placement can help but may not provide a total solution. Avoidance of thick areas is a better answer.
The more challenging the design, the more resin choice matters. Polycarbonate, for example, will produce voids in virtually any thick-walled area. Polypropylene is prone to sink and the creation of tiny bubbles in thick areas.
Acrylic, on the other hand, is generally better in thick cross sections. Glass-filled materials, the “bad boys” of the resin world, are almost always challenging, particularly in uneven geometries in which their impaired flow characteristics can create warp and a host of cosmetic problems.
In summary, three factors affect resin flow: Design, material, and gating. In general, you control the first two while Protomold controls the third. Protomold will typically gate at the thickest area and flow toward the thinnest.
Gus Breiland is the Customer Service Engineering Manager at Proto Labs. To get more injection mold design tips like this, check out Proto Lab’s website or check out their Design Tips newsletter
